Access Restrictions
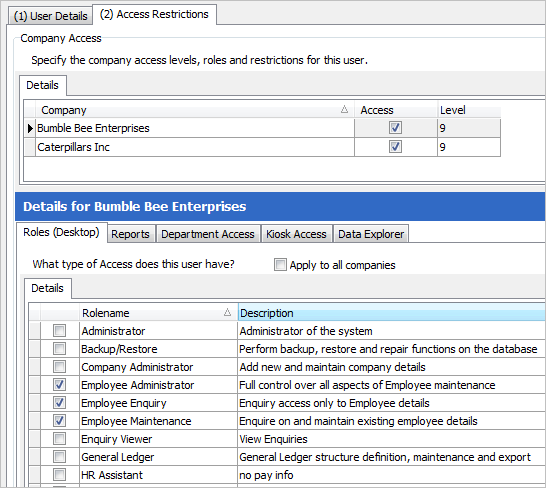
Each User should then have restrictions applied. Select the Access Restrictions tab:

Company Access
The first, and overall, restriction is: does the User have Access to a specific company? If they do not have access to a company (i.e. you have not ticked the relevant box), then any other restrictions are irrelevant, because they won’t be able to see anything in this company.
Levels
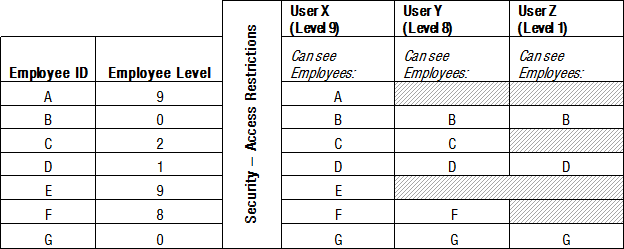
You can also apply Levels (1 to 9. This links to the setting in Security Access Employee Level (via Employee Details). The user will be able to see everyone at the same level and below. For example, a User at Level 7 in Access Restrictions would be able to see everyone at Employee Level 7 and below:

Note that not all Level numbers need to be used – only those that will best suit your company requirements.
This feature is not available in HR3pay Lite.
Details for Company
There are several tabs in this area of the window, giving you the option of setting specific restrictions. Note that if you do not apply any restrictions in these tabs, the security process will only apply the Level set within the Company Access area.
Roles (Desktop)
Within each company that they are allowed to see, you then apply Roles (such as HR Manager or Employee Administrator) to the User. Tick the boxes to the left of the relevant Role names to select them.
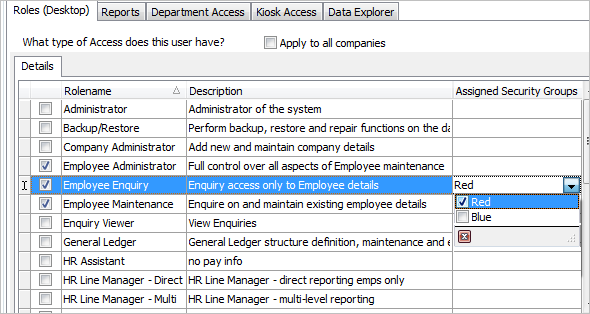
The Assigned Security Groups column is applicable if Security Groups are in use. To assign a Security Group to the Role for this User, click in the column and select a name from the drop-down list. By assigning a Security Group to the User's Role, you are applying the restrictions specifically to the employees within the Security Group.
Note: if appropriate, tick Apply to all companies, to save having to repeat the setting per company.
Reports
If you wish to restrict the user to specific reports, tick the ‘Limit access’ option. Note also that this can be applied only to the current company, or you may tick the ‘Apply to all companies’ option if relevant.
If you select the ‘Limit access’ option, the Add and Remove buttons will become available. Click Add to display the Reports Selector which displays the various groupings of report types. You may tick the relevant boxes at this top level (e.g. HR Reports or Historical) to allow the user to view all reports within that report group. Alternatively, click the buttons to expand to sub-levels or to individual report titles. Tick the sub-levels or the individual reports as appropriate. Click OK to save your changes.
Department Access
Restrictions can be placed on the departments a User is able to access. Restrictions are applied in the same way as for Reports.
Typically Department restrictions are used if HRpack’s Org Chart restrictions (or kiosk Single or Multi Level settings) have not been applied. See Org Chart Restrictions with HR3's hr module for more details and an illustrative example of how this works.
Kiosk Access
If the user is a Manager and you want to restrict their access to their own team only, tick the option ‘Grant this manager restricted “My Team” access’. Note that you can apply this restriction for the current company or across all companies.
While payroll uses the terms ‘Direct’ and ‘Multi’, kiosk uses the terms ‘Single’ and ‘Multi’. (Refer to Illustration of Restrictions based on Org Chart.)
Data Explorer
This tab refers to the user’s access to various report types within the Data Explorer function in payroll. Tick the types that you want them to be able to see – for example it may be appropriate for all users to view the Employees reports, but you might want to ensure that most users are not able to see the Wage Analysis group of reports.

